How to Customize Your Shopify Store Emails, Theme, Domain, and More
- Get link
- X
- Other Apps
Something makes an Apple store feel different from a Samsung store, Starbucks from a local coffee shop, Uniqlo from Gap. Walk into a McDonald's in any country, and while some things may look unfamiliar, in general, it still feels like a McDonald's. Even embassies often retain the feel of government offices in their parent country.
That carries over to the web, too. It's easy to tell an Apple Store page apart from Amazon at a glance.
Your Shopify store needs the same. Whether a minimal brand or an intricately crafted style, your online store should be instantly recognizable as yours. If someone opens your product page, receives a receipt email, or sees promotions on Facebook, they should recognize your store's branding at a glance. Here's how to personalize every aspect of your Shopify store to build that special feeling for your store.
How to Customize Your Shopify Store
Add a Custom Domain to Shopify
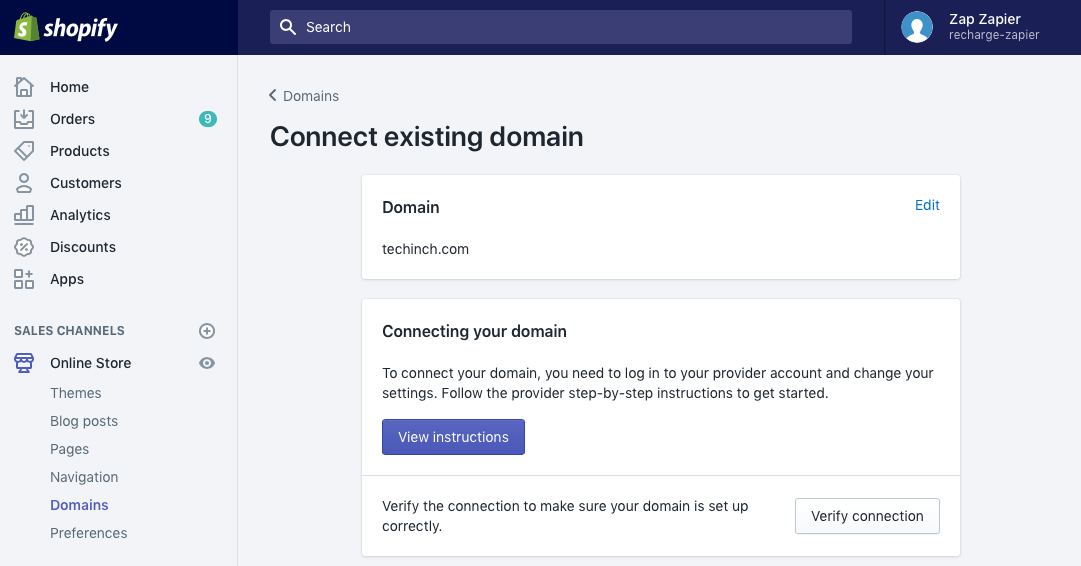
The best way to brand your store is with a custom domain, something easy enough for your customers to remember. Shopify gives your store a yourstore.shopify.com domain name by default—but it's best to have a unique domain name (a .com or other web URL) to make your store recognizable.
Don't have a domain name? Open your Shopify settings, select the Online Store option in the left sidebar, then click Domains. There, from the Buy button you can search for the domain you want and purchase it from $14 per year.
Have an existing domain name? Set your domain's A record to 23.227.38.32 and its CNAME record to shops.myshopify.com to redirect your domain to Shopify. Then in your Shopify domain settings, click Connect Existing Domain, enter your domain name, then click Verify Connection. Do note, though, that it may take a day or two after changing your A and CNAME records for the domain to show up correctly.
How to Add a Shopify Theme to Your Store
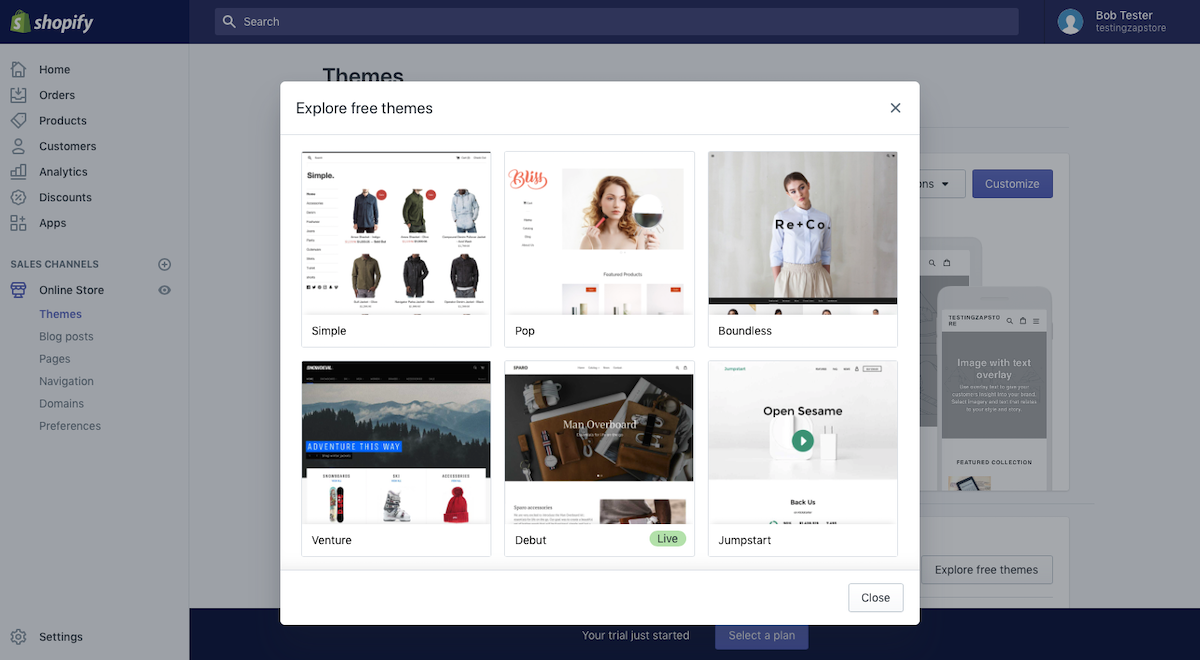
You picked a unique name for your Shopify store, added products, and answered all the default questions Shopify asks to open a store. Then comes the fun part: picking out a theme. Even if you're not a designer or developer, there are dozens of themes to make your store look as classic or modern as you'd like.
Shopify includes ten free themes, with over 50 other themes for sale in the Shopify themes store from $140 each. Or, explore online—there are hundreds of Shopify themes from independent designers or marketplaces like Envato Elements and Creative Market with a wide range of prices.
Once you've found a theme you like, you need to install it. Click the Online Store tab in Shopify's left sidebar, then choose Themes. Then, here's how to add each type of theme:
- Free Shopify Themes: Click the Explore Free Themes button on your Shopify Themes page to view Shopify's free themes in a popover. Choose the theme you like, then click the Add button to install it in your Shopify store.
- Paid Shopify Theme Store Themes: Preview the theme you like from the Shopify Theme Store site, and click the Try Theme button to add it to your Shopify store. If you like it and decide to purchase it, click the Actions button beside the theme's listing in your Shopify Theme settings and select Buy.
- Shopify Themes From Other Sites: If you buy a Shopify theme elsewhere, download the theme's
.zipfile to your computer. Then on your store's Shopify Theme settings page, click the Upload Theme button and select your theme file to add it to Shopify. - Your Custom Shopify Theme: Want to build a brand-new theme? Code your theme using Shopify's Liquid layouts, save all the theme assets as a
.zipfile, then upload them as you would with a Shopify theme purchased elsewhere.
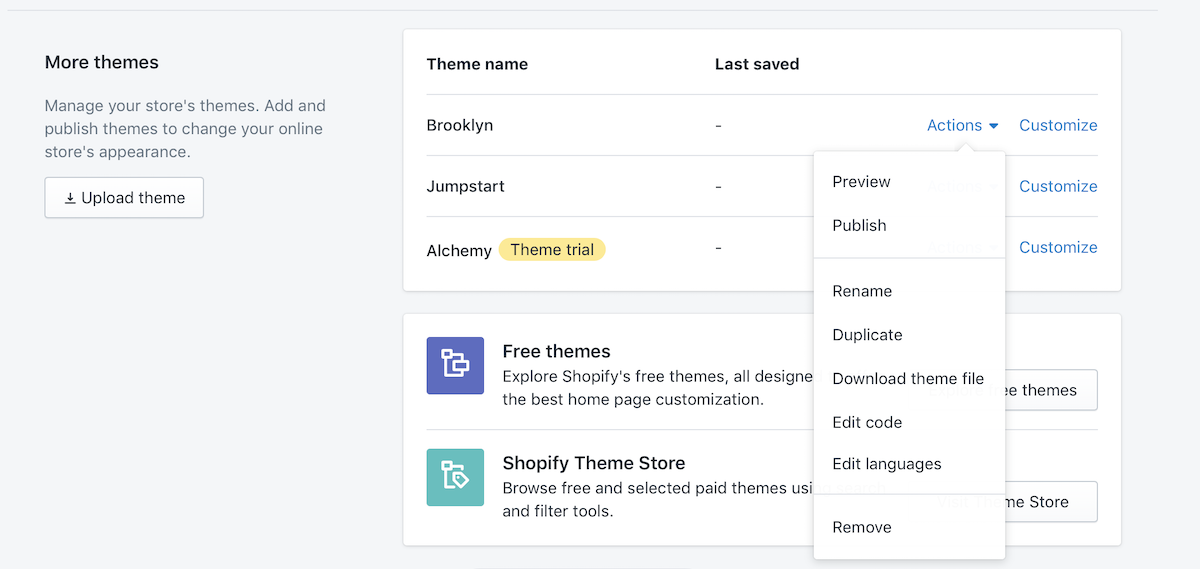
Shopify will then list every theme you've installed on your Shopify Online Store Themes page. Paid themes will show a Theme Trial tag until you purchase them—otherwise, every Shopify theme includes the same options. You can preview the theme on your store and tweak how it looks with the Customize link or click the Actions menu for more options.
How to Customize Your Shopify Theme
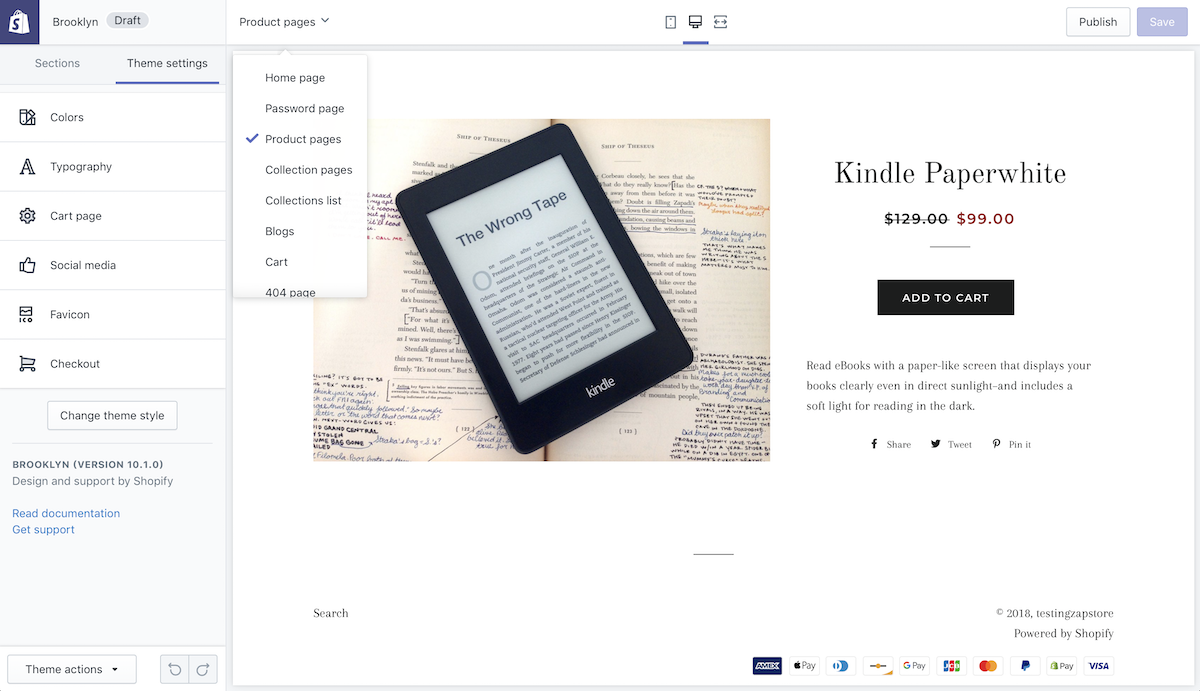
Your core Shopify theme sets the general look and feel of your store. The magic is in the details. Through the general theme settings and the Sections on each page, you can turn the theme into something that feels unique for your brand.
Start with a theme that already is generally similar to your ideal store design. Click that theme's Customize page to your store's products and pages with that theme's design on the right, with a sidebar on the left to customize the page. From the toolbar over your store preview, you can switch between desktop and mobile views, or choose the part of your store to preview. And in the lower left corner, you can undo or redo changes, or preview your store and edit its languages and code from the Actions menu.
Sections
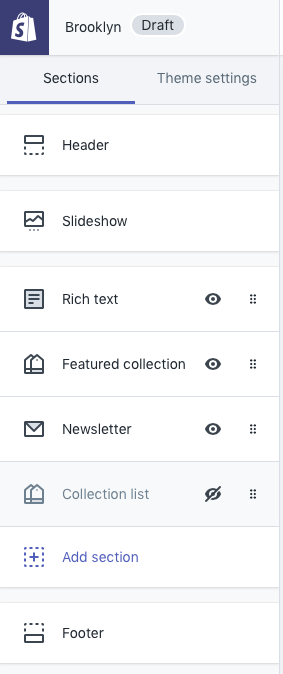
"Design is how it works," said Steve Jobs, and Shopify prioritizes that in your store with the Sections tab showing up first. This is where you set how your store's home page looks—along with the content and features in every other part of your store.
On the home page, you can drag-and-drop any of the page sections with a dot handle icon into the order you want. Want visitors to sign up for your email newsletter for a discount? You might want to move the Newsletter widget higher up the page. Or, hide sections that aren't important—you could click the eye icon on a default widget if you don't want it to display.
Want to add something new to your store—perhaps a map with your storefront location or a list of your recent blog posts? Click Add section, then click the new section to preview how it'd look on your store. If you like it, click the Add button, then drag it to the order you want.
You can't change the main design on most pages in your Shopify store, but you can deeply customize the home page along with some other pages depending on your theme. It's worth clicking through the list of pages to see which widgets each offer in their Sections panes.
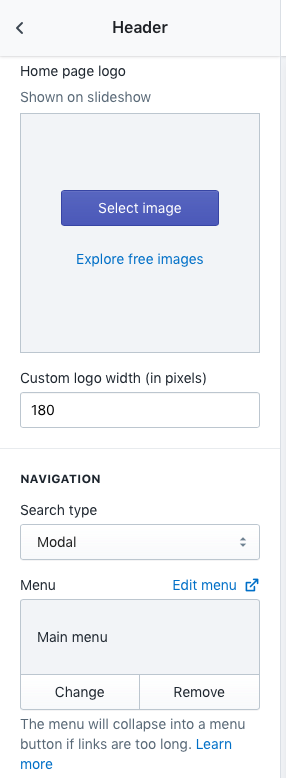
Then, you can customize each section. Click the section, and its options will open in the sidebar. Some are simple; the Newsletter widget includes a heading and formatted subheading, while the Featured Collection widget lets you select one collection and how to display it. Change anything you want, preview the new copy and style live in your site preview, then click the back arrow in the top left corner to go back and edit another widget.
The most detailed widget is the Header widget—and changes you make to it and the Footer show up on every page. This is where you add banner and logo images to personalize your store, customize your store's menus, and can add a seasonal announcement bar to your site. Change anything here, and the header changes on every page across your site. Similarly, if you edit the Product Pages widget on a product page, it will change those settings for every similar product page.
Theme Settings
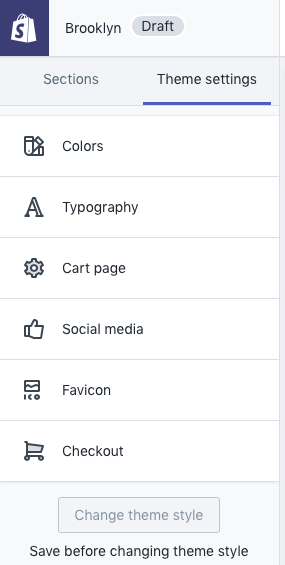
When your page layout looks the way you want, select the Theme settings tab in the same sidebar to tweak your store's colors, typography, social media, and checkout experience.
Colors are the easiest to pick. The Colors options will show the colors for your theme's default background, headings, body text, lines, button, and other core sections. Click the color to either enter a color hex code or choose a color from the palette.
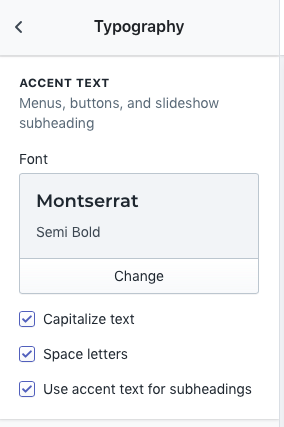
Typography works similarly, showing the font for headings, accents, and body text, along with options for font size, thickness, and more. Click the Change button on an entry to select from dozens of typefaces from Google Fonts. Want to use a font from Typekit or other web font resources? You need to edit your store theme's code to add a 3rd party font.

The Checkout page settings include the most options. You can add custom graphics to your order and checkout pages, pick the typography and colors to use. Then if you want to change the checkout form options, Shopify includes a link in the settings pane to jump over to your store's core checkout settings where you can set which form fields to show in checkout, give customers an option to subscribe to your emails, and change your checkout language.
Code
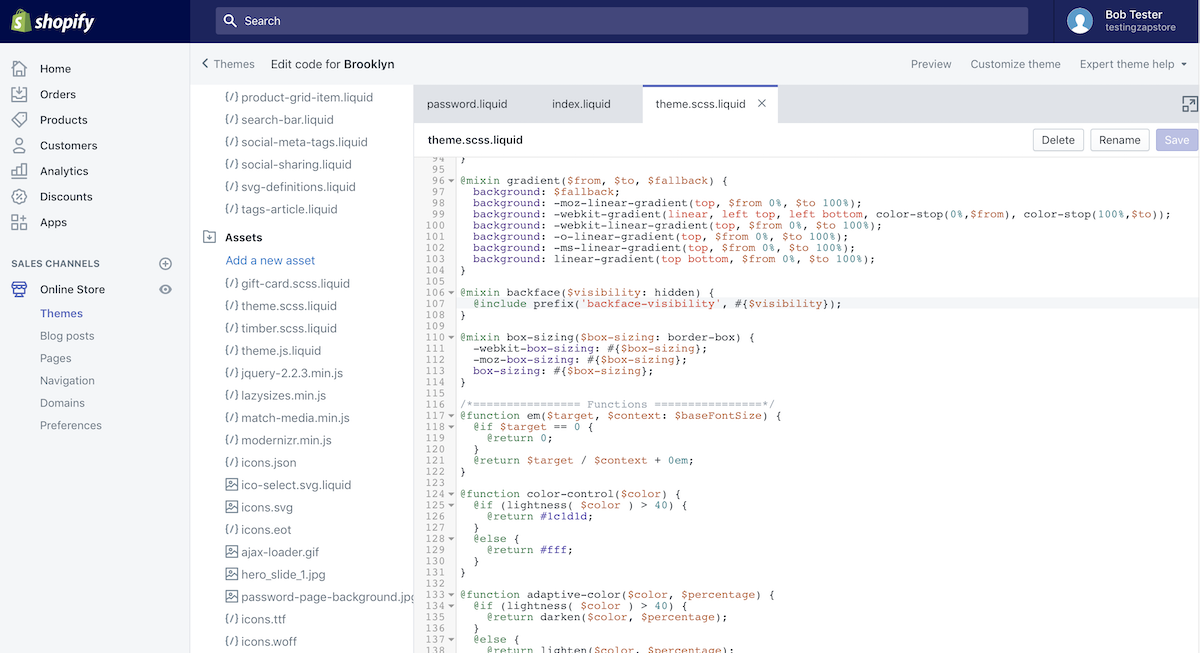
Haven't found the thing you want to change in your Shopify store theme? You can edit any part of your store's theme from the Code page to get Shopify looking exactly the way you want—though it takes a lot more work.
If you're an experienced web designer, you could start from scratch or use an existing theme as a base to start building a design. For everyone else, if you want to remove some small part from your store site or want to change a bit of the design, you can often find it by searching through the files. Do note, though, that the search pane at the top left of the editor only searches through the names of the theme files, not through the text of the files themselves.
Want to play around with coding your theme? Try our Inspect Element tutorial for a quick way to learn what makes your Shopify theme work, and our guide to building a landing page for an HTML and CSS crash-course.
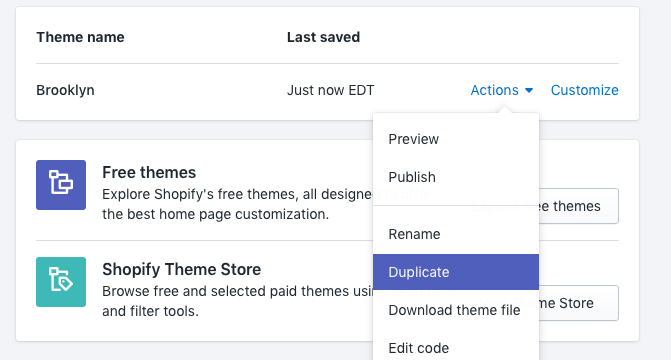
The best thing is, you can experiment. From your Shopify store's main theme settings, you can Duplicate a theme to make changes to the theme without undoing any other changes you've made to the theme or breaking it entirely. You could always duplicate your theme before you start making changes, then only switch to your newly tweaked theme once you're sure it looks good. That's especially helpful if you're editing your site's code and aren't confident in working with HTML or CSS.
Branding
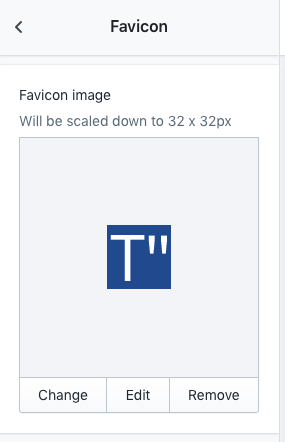
Then you should add a favicon—a small square icon for your site that shows up in browsers beside your domain name, and in bookmarks menus. Your favicon icon should be 32x32 pixels, or at least should be square, and Shopify can scale it down for you then convert it to the favicon-standard format.
To add the favicon to your store, open the Theme settings in your store's theme designer again, and this time select Favicon. Upload your image, and Shopify will do the rest.

There's one tiny thing left. Want your store to look unique, and not instantly recognizable as another Shopify store? You can remove the Powered by Shopify text from your store from your theme's code.
Open your theme's code to edit it, and select the footer.liquid file from the Sections folder. There, search for the text and remove it from your theme. Save the changes, and you shouldn't see any Shopify mentions in your store footer. If your theme includes other branding, such as the design firm or other details, you can remove those as well if you like.
How to Customize How Your Shopify Store Looks in Search
New customers won't see your store website first. Far more likely, they'll search for your products and see your site on Google or Bing. If that catches their attention, they might click the link and see your store's design.
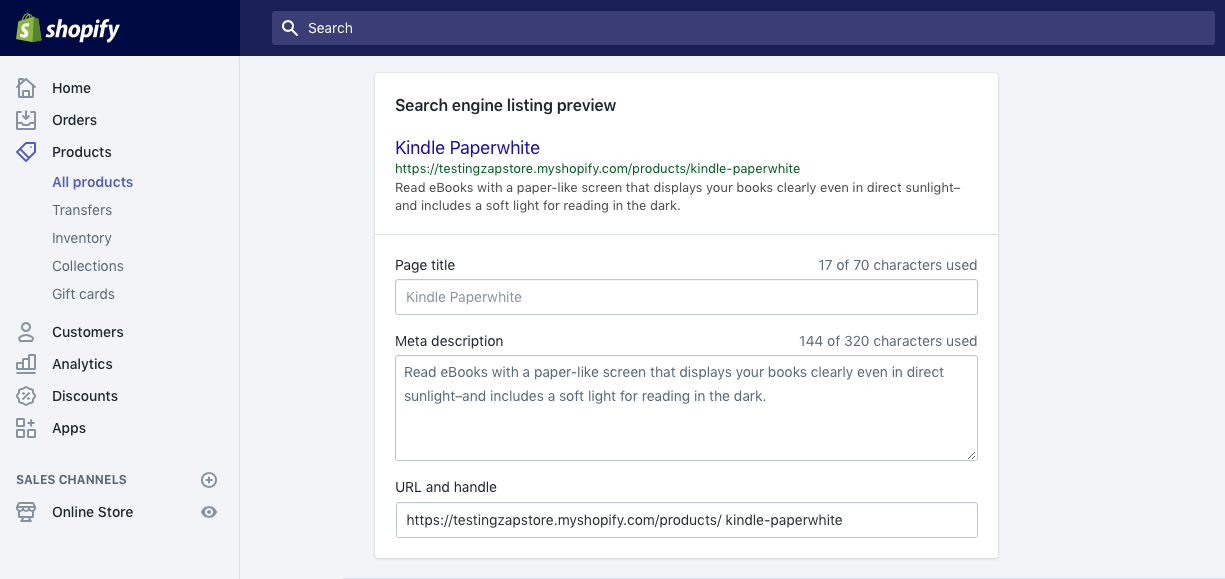
That first impression in Google's search results is essential. By default, whenever you add a new product to your store, Shopify will show the product name on Google, followed by a shortened version of your product description. You can preview how that looks at the bottom of each product listing. Click Edit website SEO to change that, if you want, where you can add a new page title, description with up to 320 characters, and a custom link for that product.
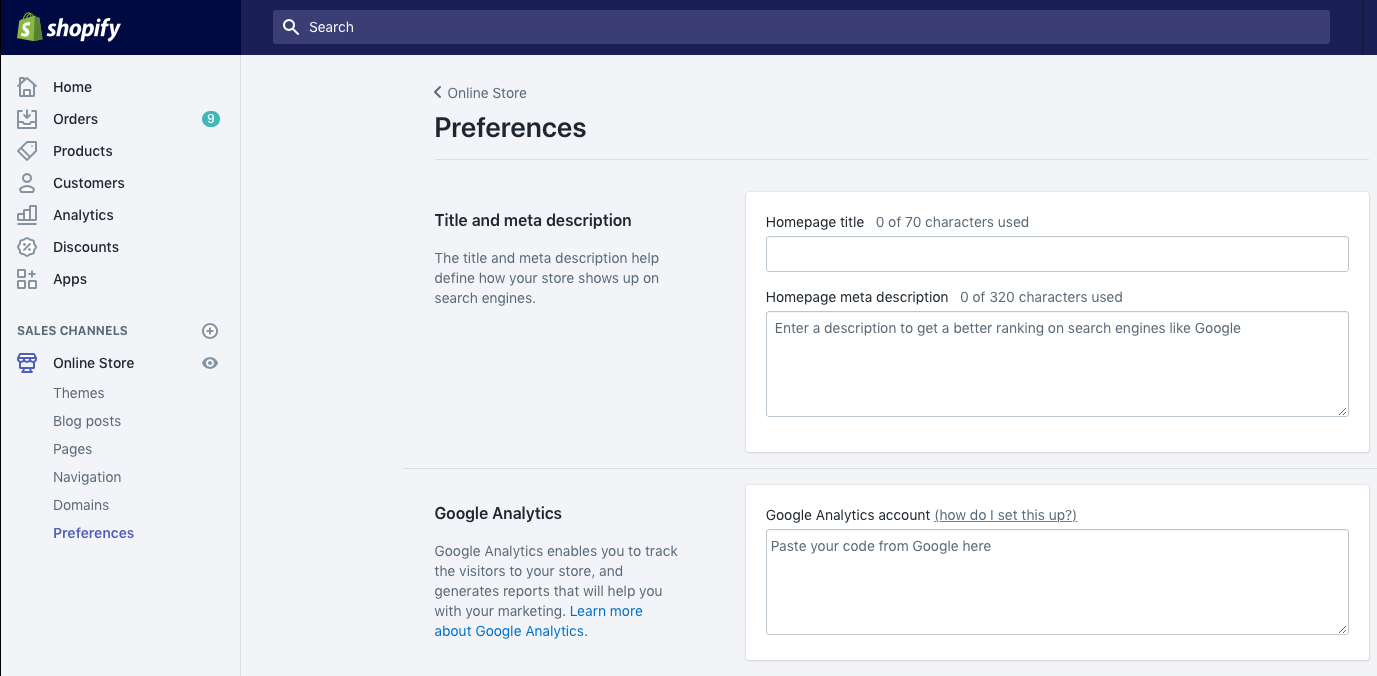
Shopify includes similar options on your blog posts and standalone pages, too. Want to change how your main store itself appears in search? Open your Shopify Online Store Preferences from the left sidebar, and add a custom Title (which will be your store's name by default) and description if you like. You can also add Google Analytics code here to track your store traffic, too.
Tip: Here's how to make a custom Google Analytics dashboard in Google Sheets for an easy way to check your store's stats.
How to Add Your Shopify Store to Social Networks
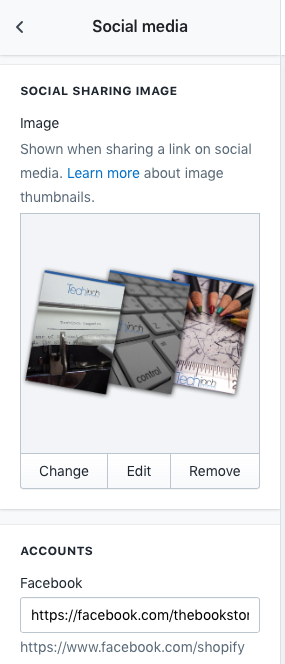
Something similar works for social networks, too. If you share a link to your products on Facebook or Twitter, they'll show a preview of your product and its description automatically. From your Theme settings' Social Media tab, you can also add a banner image for your store. That way, if someone shares your store on Facebook, or if you publish a product without a preview image, those links will include a custom image, too.
The social media settings also let you include links to your store's Facebook Page, Twitter, Pinterest, Instagram, and more. Add the full URL to the correct accounts, and Shopify will add them with icons and links in your store footer. You can also turn on sharing options from that tab so your customers can share your products on social networks easily.
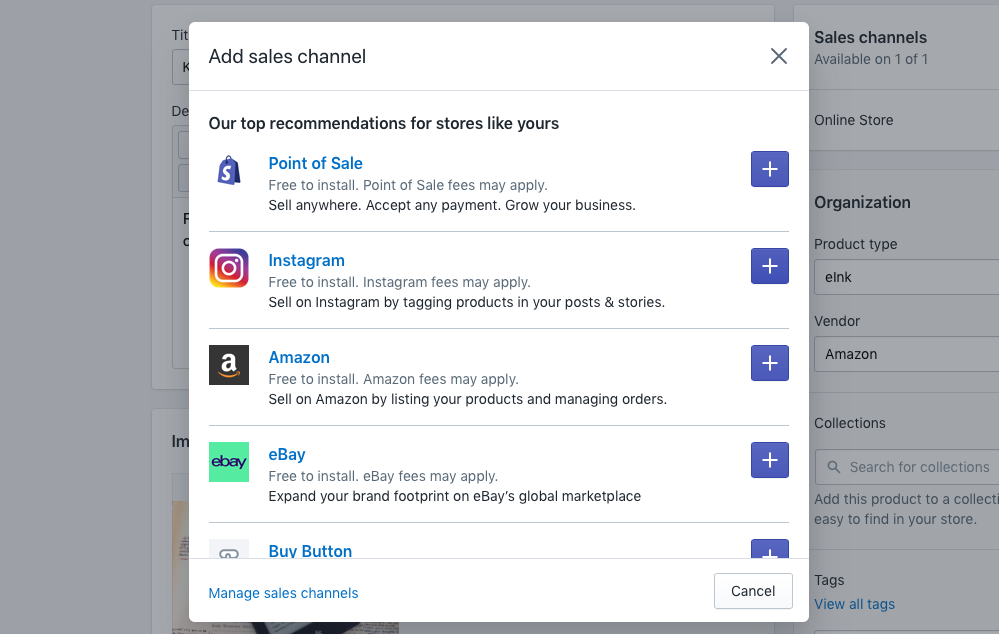
Want to promote your products on Facebook, Pinterest, Instagram, and more? Click the + button in Shopify's left sidebar beside Sales Channels, and you can choose from popular social networks along with eCommerce sites like Amazon. With Facebook, for example, Shopify can add a new tab to your Facebook Page with each of your products. With Instagram's integration, you can tag products in posts to direct your followers back to your store.
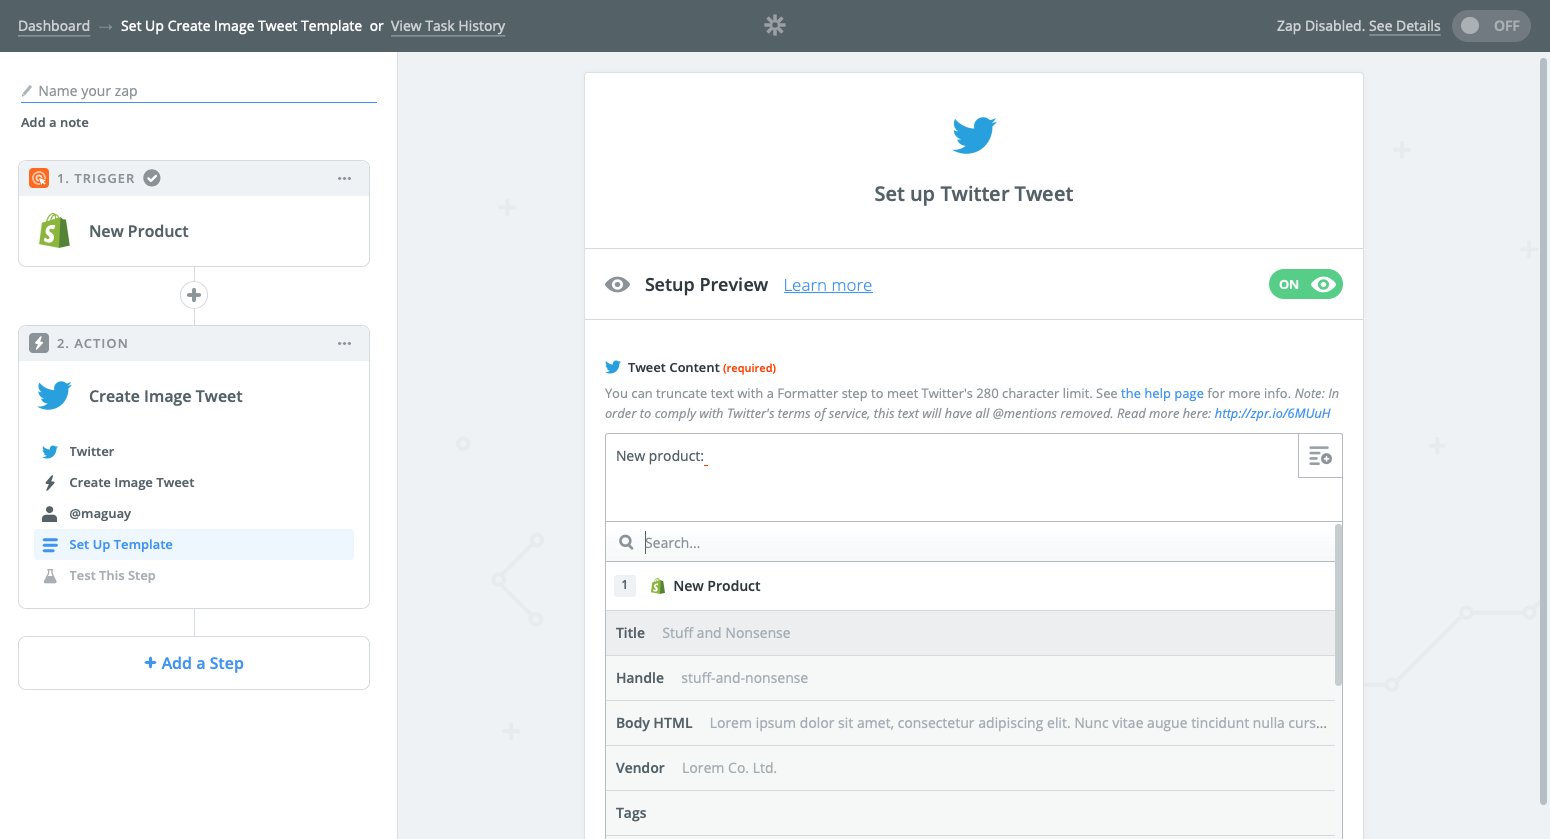
Or, you could automatically promote your new products with app automation tool Zapier. Want to automatically Tweet every time you add a new product to your store? With Zapier, you can build a Zap (or workflow) that watches Shopify for a new product—then have Zapier copy the product name, image, and details and share them on Twitter automatically. Or, you could have Zapier watch for new blog posts on your Shopify store, and share those as well. Here are a few workflows to get started:
New to Zapier? Learn more about how to automate your work in our Zapier Getting Started guide.
How to Customize Shopify Notifications
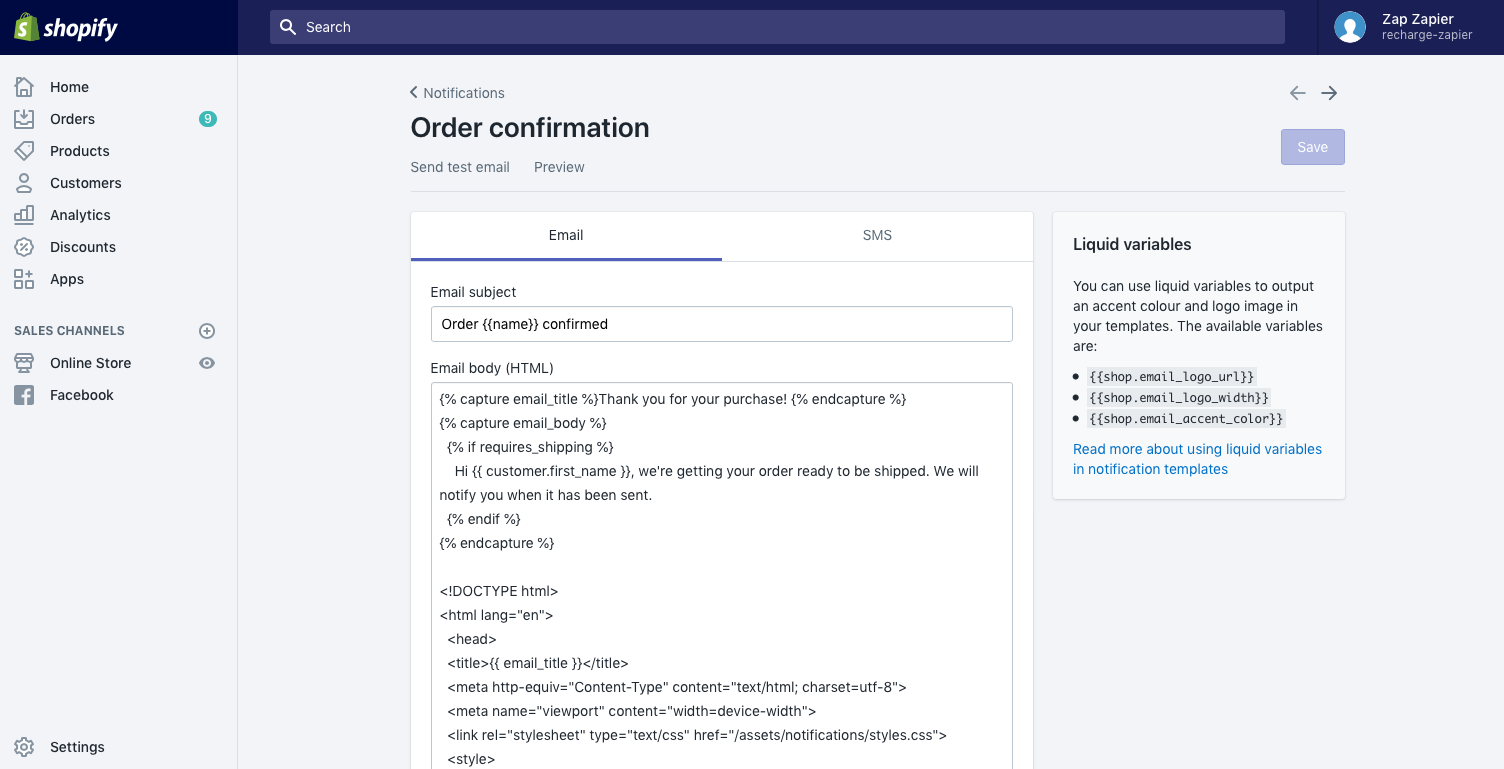
Now for something a bit more hidden: Shopify's email and SMS notifications. Whenever a new order, shipping notification, refund, or 14 other things happen in your store, Shopify will send a custom email or SMS to your customer about it. Shopify also can email you wherever there's a new order, and it includes an RSS feed of new orders that you can subscribe to in your news app if you'd like.
The default emails work—but this is another chance to make your store feel unique. To change the emails, click the Shopify settings icon in the lower left corner of your store's settings page, select Notifications, then click on the email you want to edit. You can format the email body with HTML, with Shopify's liquid variables to add the customer's name and their order details. Try changing things, then click Preview to see how the new email looks—or click the Reset button at the bottom if you mess something up.
You can't turn off Shopify's notification emails, so be sure to edit each of them to add your branding.
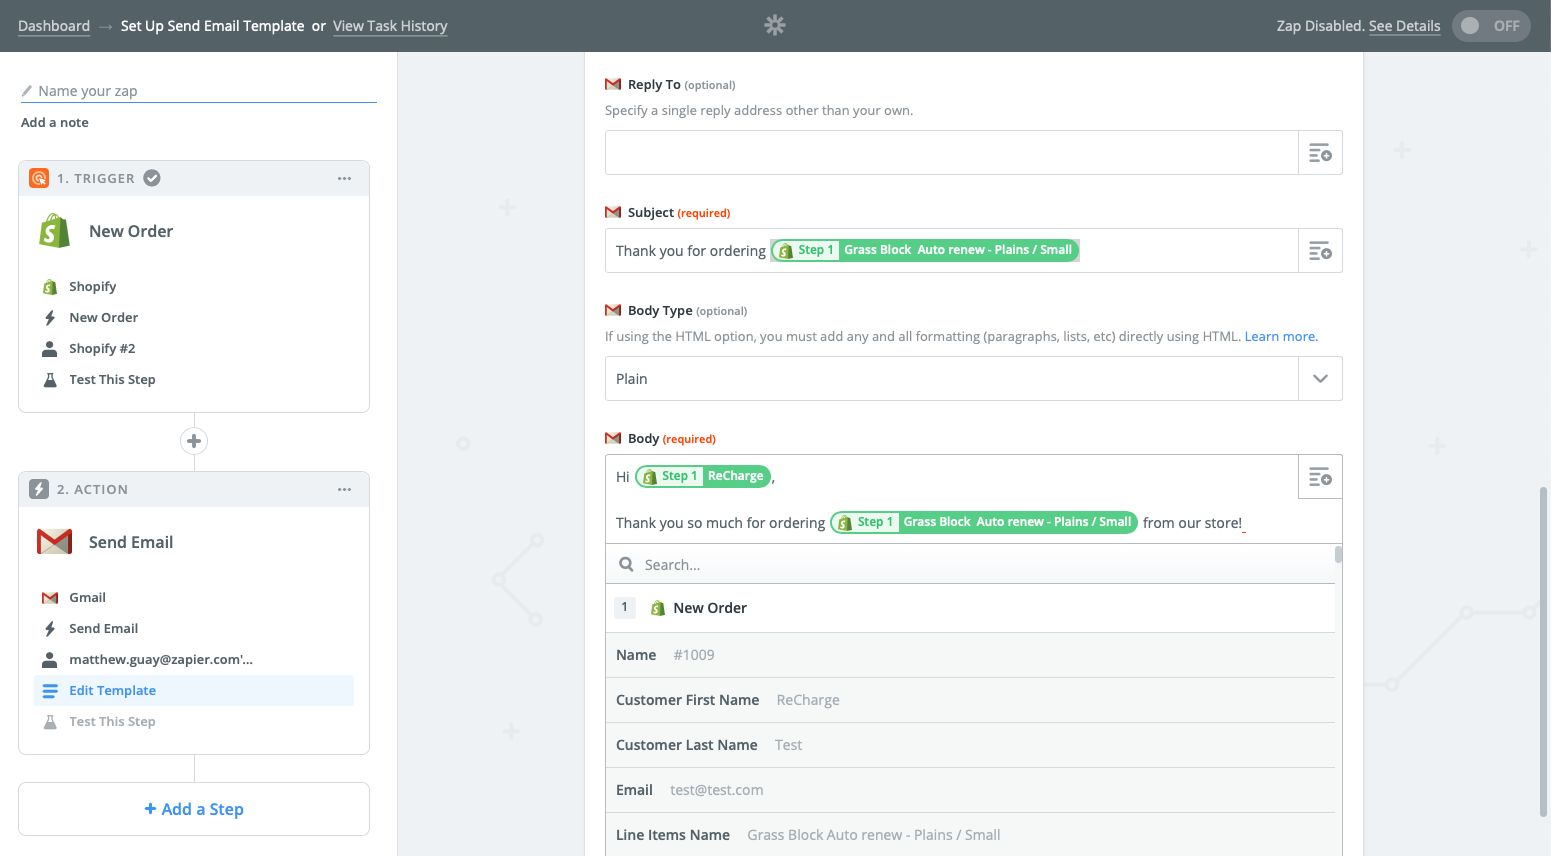
Then, for an extra personal touch, you could send a thank you email to customers from your email account with a Zapier automation. Shopify will automatically send your customers an email when they first make a purchase, and with your work before, those emails will now include your store's branding.
Then, perhaps a few hours later, you could send a personal email to your customers as well. That would be too much work to do every time—but Zapier can do it for you with its Gmail and Shopify integrations. Make a new Zap that watches for new Shopify orders. If you want to have Zapier wait before sending the email, add a Delay action to your Zap and tell Zapier how long to wait. Then, add a Gmail Send Email action and connect your personal email account to Zapier. Click the + icons beside each field to pull in details such as your customer's email from Shopify, and write your email in the Body.
Turn on that Zap, and each new customer will get a personalized email about their order, something that feels more like a handwritten note than your default Shopify emails.
You can also use Zapier to send your team customized notifications about new orders. Shopify will email you for new orders—but Zapier can also watch for new customers, canceled orders, abandoned carts, and more. Then, add a Gmail action to send a custom email to yourself or your team with the details—or use our SMS, Slack, and hundreds of other integrations to get the details where your team needs them most.
How to Customize Your Shipping Labels in Shopify
Your store, social networks, domain, and even email notifications use your store's design. But it doesn't stop there. When your customer receives your product in the mail, youl want your branding to carry over there, too—the same way Amazon boxes are instantly recognizable.
Buying custom shipping supplies is expensive, and likely not worth the investment when you first start your store. Instead, you can customize your shipping labels and the print invoice you put in the box to give your packages the same feel as your website. You could do that in Microsoft Word or another word processor, with a template where you copy and paste in your order details. Or with Zapier, you could get personalized shipping labels automatically.
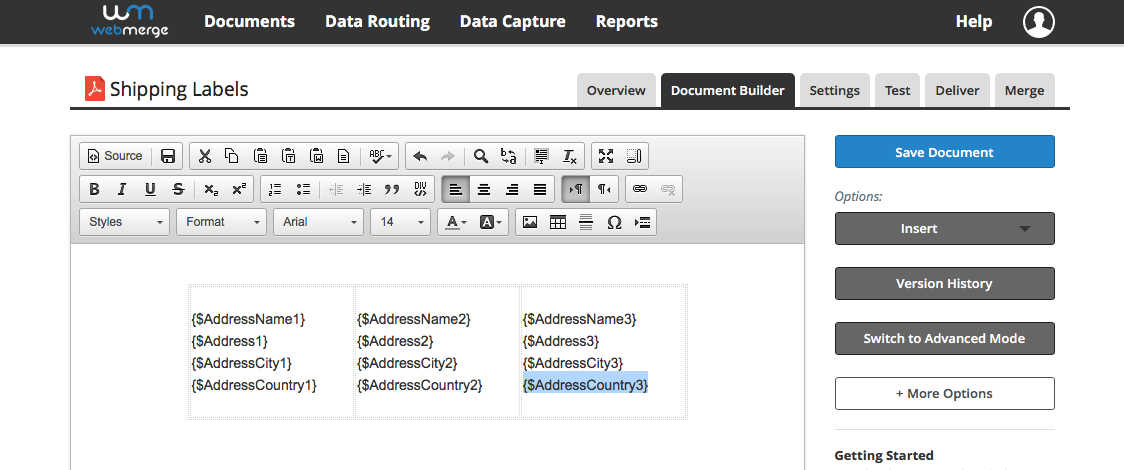
It starts, again, with a template—though this time, the best option is to make a document template in WebMerge, an app designed to fill out document templates automatically. Add the details and branding you want. Then, make a Zap as before that watches for new orders. This time, have Zapier send the data to WebMerge where it will make a personalized version of your label or invoice template for this customer. When finished, Zapier could send your document to Google Cloud Print and automatically print out the label, so you don't even have to click a button.
→ Continue reading in our full guide on how to automatically print shipping labels.
“A minute to learn—a lifetime to master” claims reversi game Othello. That could easily apply to Shopify. It’s incredibly easy to start an online store today, so much that you could decide to sell something and have it listed in a new online store in under half an hour.
But it’s worth taking time to dig deeper. With an extra hour or two, you can make Shopify yours, something that doesn’t look like any other store on the internet. Without coding a new theme from scratch, you can dig deep with these steps and make sure every interaction your customers have with your store reminds them where they’re shopping. And with luck and a bit more hard work, they’ll keep coming back.
That's when your Shopify site goes from the internet equivalent of a roadside stand to a real store.
Superpower Your Shopify Store with Zapier Guides
Want to do more with Shopify? Here are the resources you need:
- Haven't opened your store yet? Start out right with our step-by-step guide on How to Build a Shopify Store—then come back to this tutorial to customize your Shopify store.
- Can't decide how to get payments for your products? Compare Shopify's built-in payment processing with Stripe, PayPal, and more in our guide to the best credit card processing services.
- Make your store run smoothly with our guide to running a successful store.
- Then find more ways to automate your store with our stories about a Shopify store that saves 40 hours a week with Zapier and another automates Shopify referrals.
Paint roller photo by David Pisnoy via Unsplash
from The Zapier Blog https://ift.tt/2IOp8FQ
- Get link
- X
- Other Apps
Comments
Post a Comment