How to Create a Campaign in Salesforce
- Get link
- X
- Other Apps
As a cloud-based customer relationship management (CRM) tool, Salesforce was originally designed to help businesses keep track of sales-related data like leads, contacts, accounts, quotes, deals, and opportunities. The platform has evolved in scope and functionality over the years to help users conduct an expanding range of activities.
Even with the most basic Salesforce license, you can create, execute, and analyze various types of campaigns, from email to telemarketing. In this tutorial, we'll show you how to get started with your first campaign on the Salesforce CRM platform.
Create a New Salesforce Campaign
In Salesforce, a campaign can be broadly defined as any marketing tactic designed to achieve a specific goal such as generating leads, increasing brand awareness, or increasing sales revenue. Typical campaigns managed in Salesforce include—but aren't limited to—email marketing, social media, search engine marketing (SEM), and telemarketing. While the Salesforce CRM platform is flexible enough to manage many different types of marketing campaigns, here we'll create an email marketing campaign to get you started.
First, you'll need to add the Campaigns tab to your Salesforce CRM home screen (unless it's already there). From the Home page, click the pencil icon to the far right of the menu bar.

Another menu box will appear called Edit Sales App Navigation Items, from which you'll select Add Item visible near the top of the menu. Make sure to then sort menu items by All in the left-hand column, type campaigns in the search box, then select and click Add 1 Nav Item.
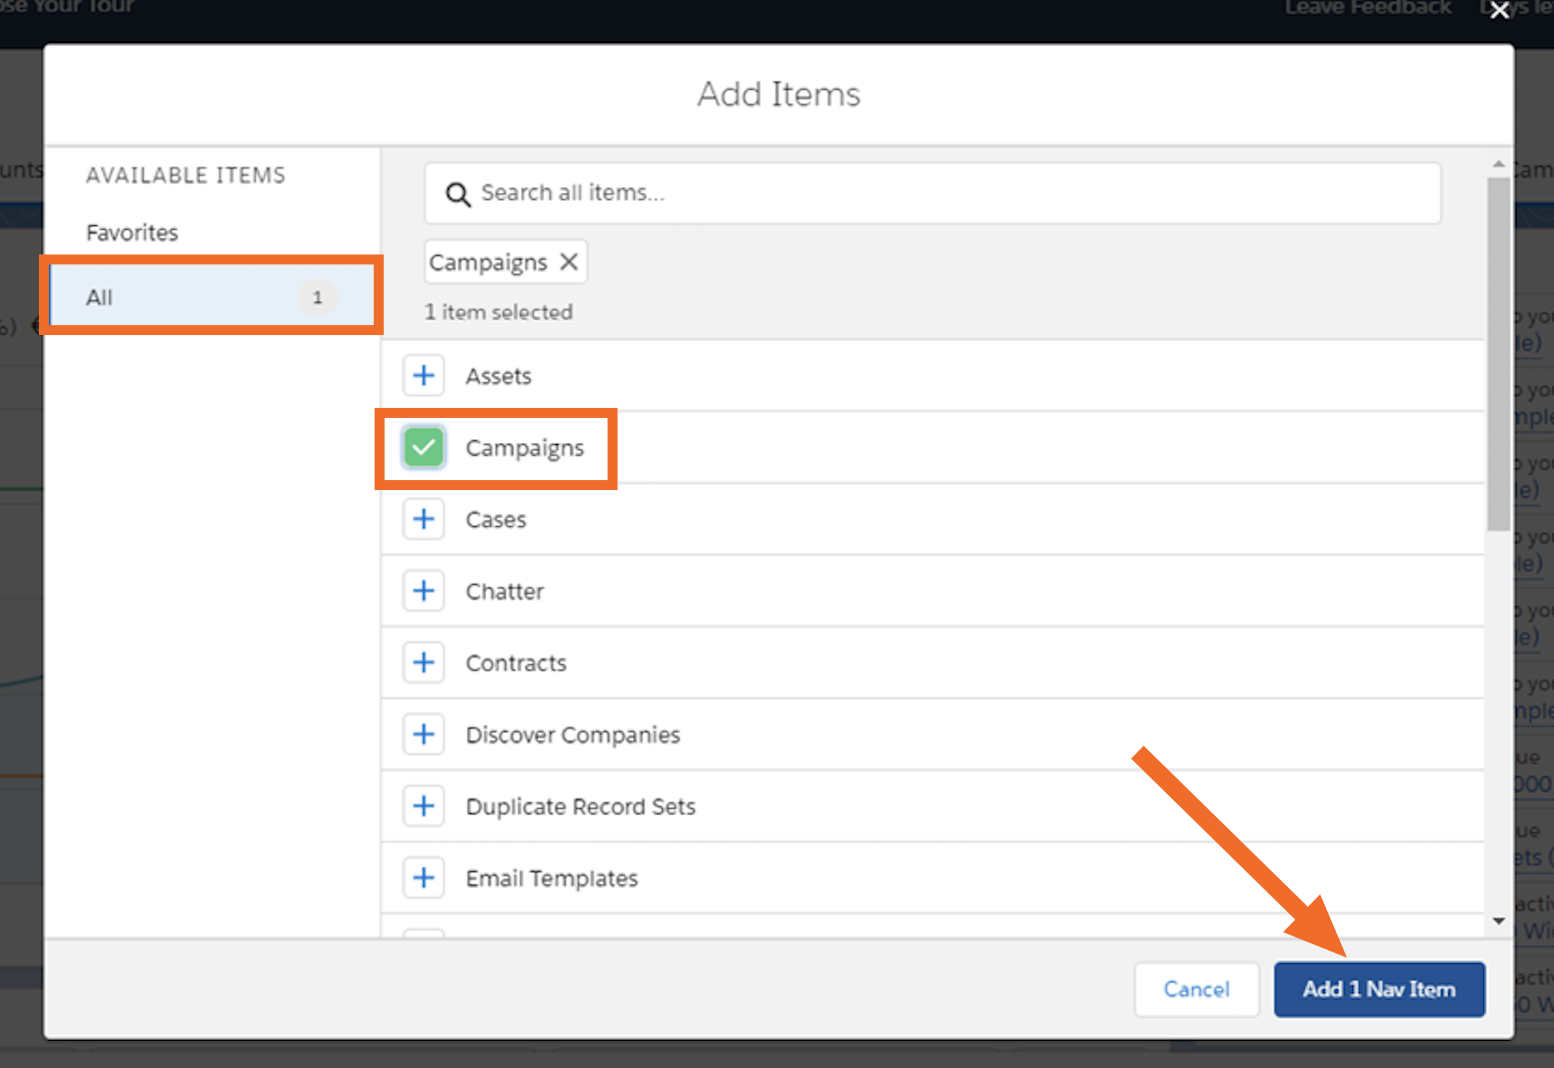
Once you've completed this process, navigate back to the home screen where you should now see Campaigns appear as an option in the top menu bar. Click the Campaigns tab, then select the + New Campaign option to begin creating your campaign.

Enter Salesforce Campaign Details
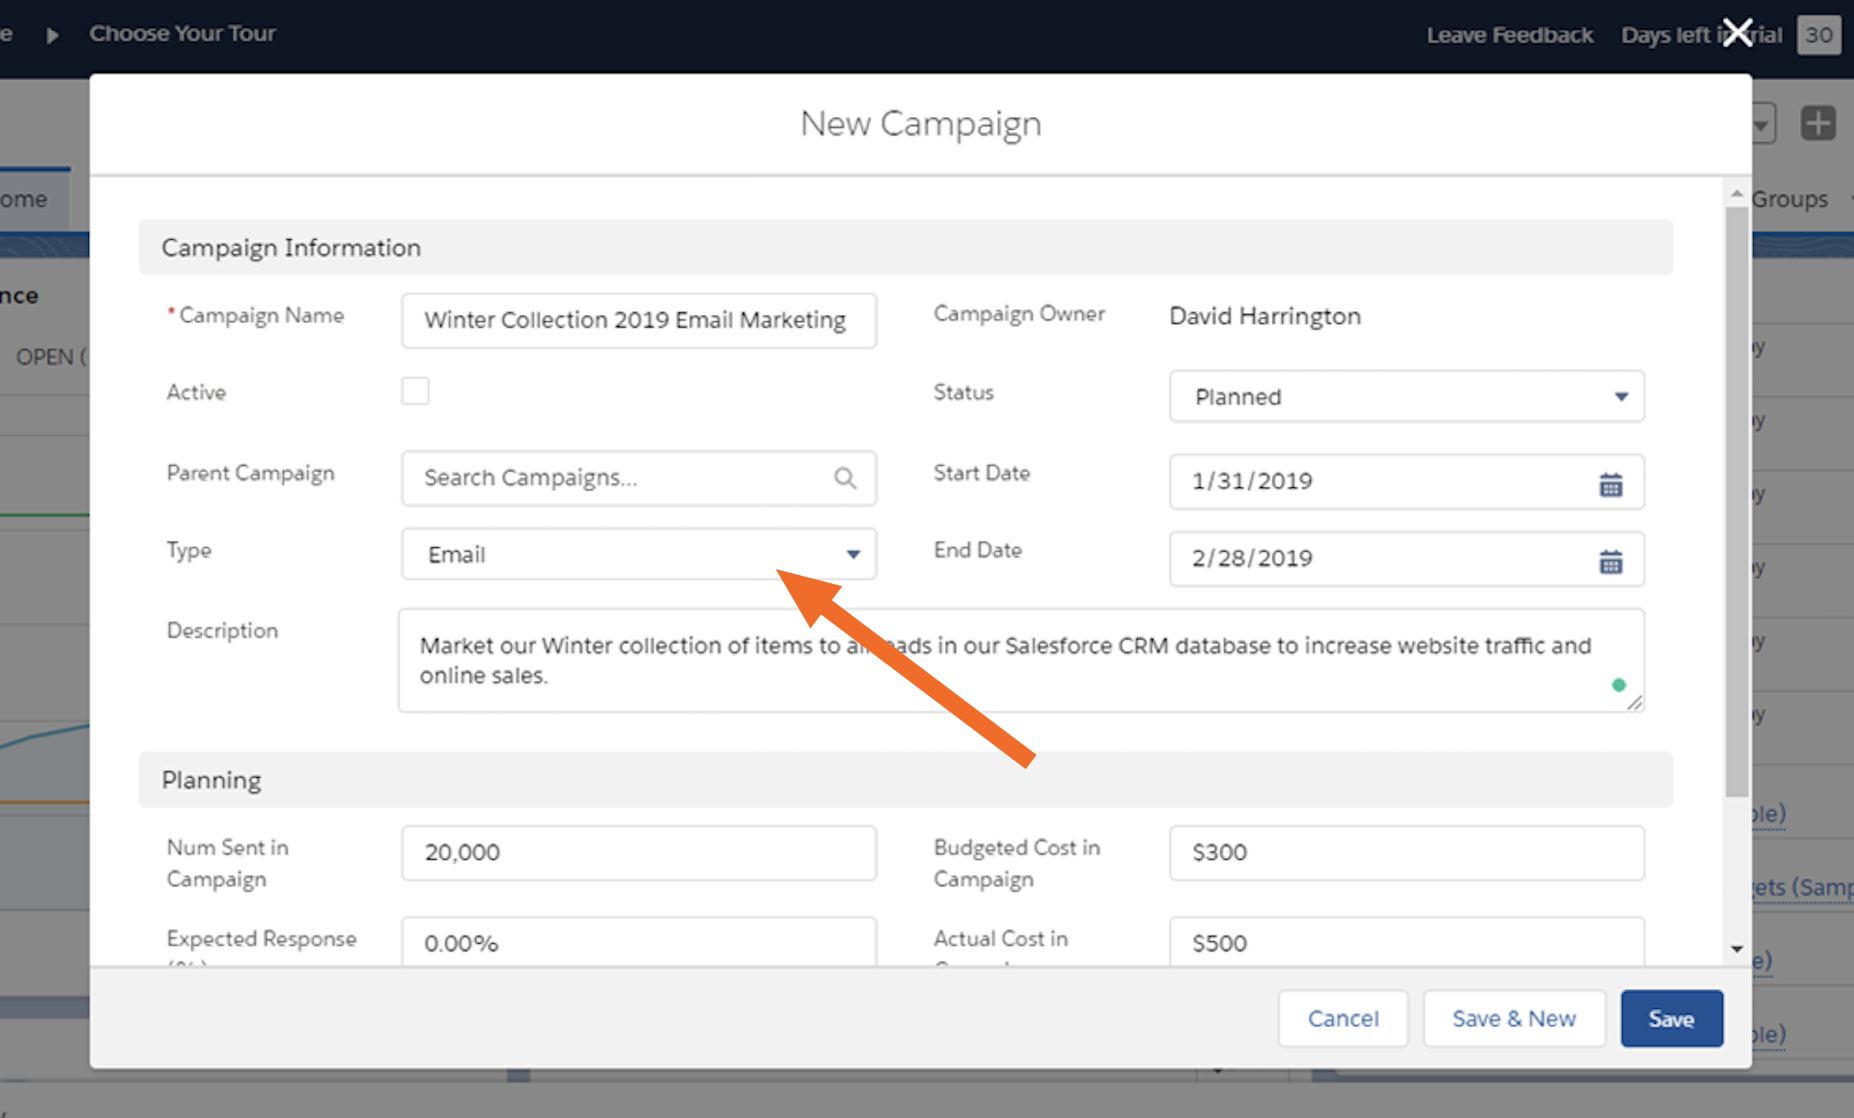
After selecting New Campaign, you'll be automatically taken to the New Campaign screen, where you'll enter all of the key data and details about your campaign. This includes information like the campaign name, start/end date, and campaign budget.
Make sure to select the Type dropdown menu to select what kind of campaign you'll be conducting—email, in this case. Other pre-built campaign types in Salesforce include Event, Referral Program, and Social Media, for example.
Associate Your Salesforce Campaign With Specific Contacts
Next, you'll want to associate a specific list or segment of contacts that your email campaign will target. If you've managed your contacts well from within Salesforce, you'll easily be able to segment the right customers and create a list (complete with emails) that your campaign will touch on.
You'll do this by going to either the Leads or Contacts tab and setting up a filter with your desired criteria. This is where it's important to maintain your Salesforce CRM so that all lead and contact information is current and accurate. Once a sales lead turns into an opportunity, for example, the person should be converted into a contact so that they don't receive marketing emails from your campaign that aren't aimed at them.
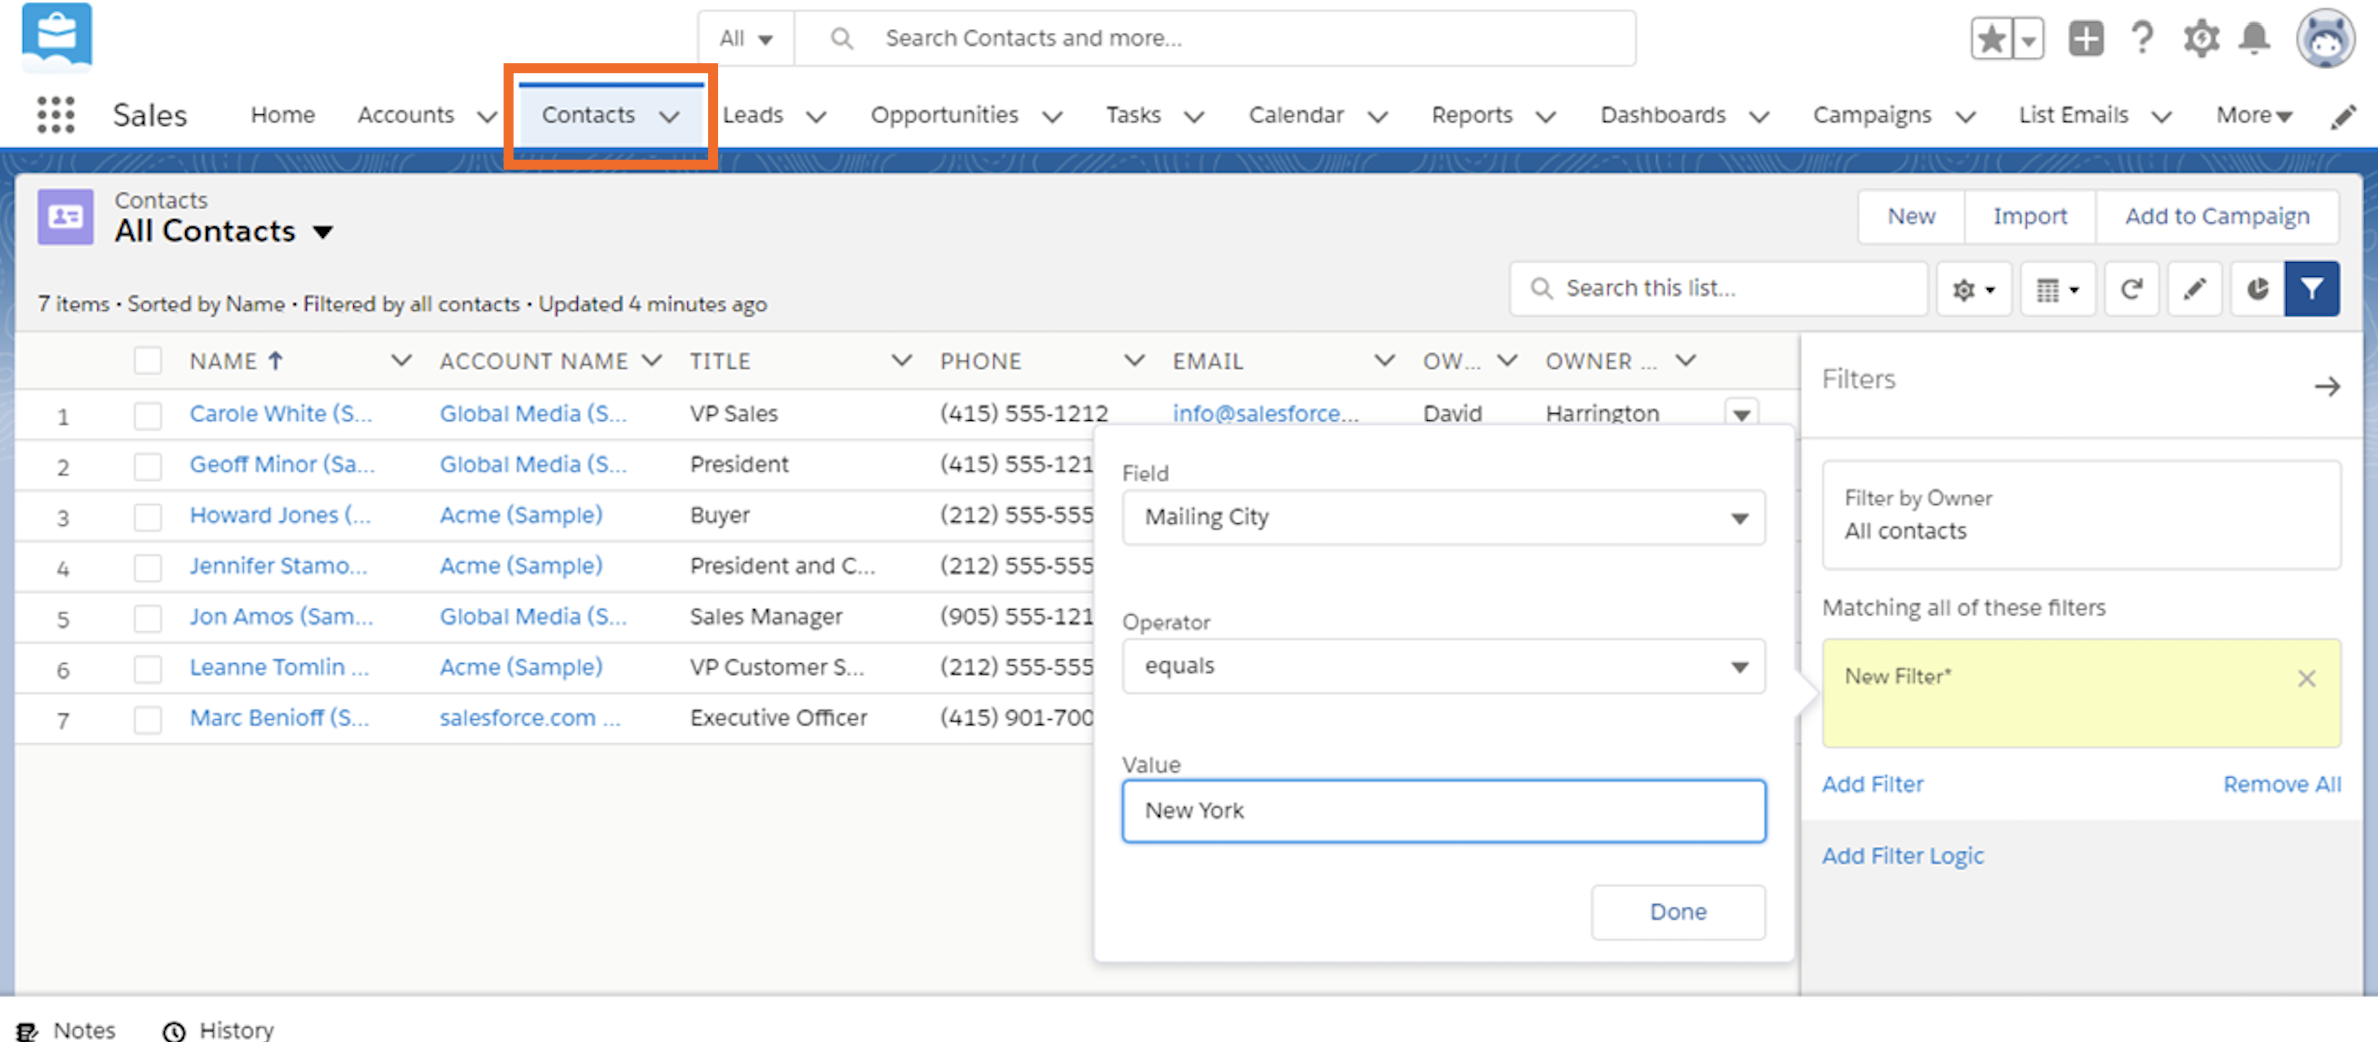
To create a filter, click on the filter icon on the right-hand side of the Leads or Contacts screen (it will display "Show Filters" if you hover over the button). A sidebar will appear where you'll click Add Filters to sort those leads or contacts by your specified criteria.
Execute Your Salesforce Campaign
Now, it's time to actually carry out your campaign activities and document/track the activities and results within Salesforce. In this case, we're sending emails, but executing your campaign could be calling leads and documenting the conversation within the contact associated with a campaign, sending physical mailers to people in a segment, or any other marketing tactic associated with your campaign.
For the email use case, once you've created your email list through Leads or Contacts, select the dropdown arrow next to Add to Campaign, and select Send List Email.
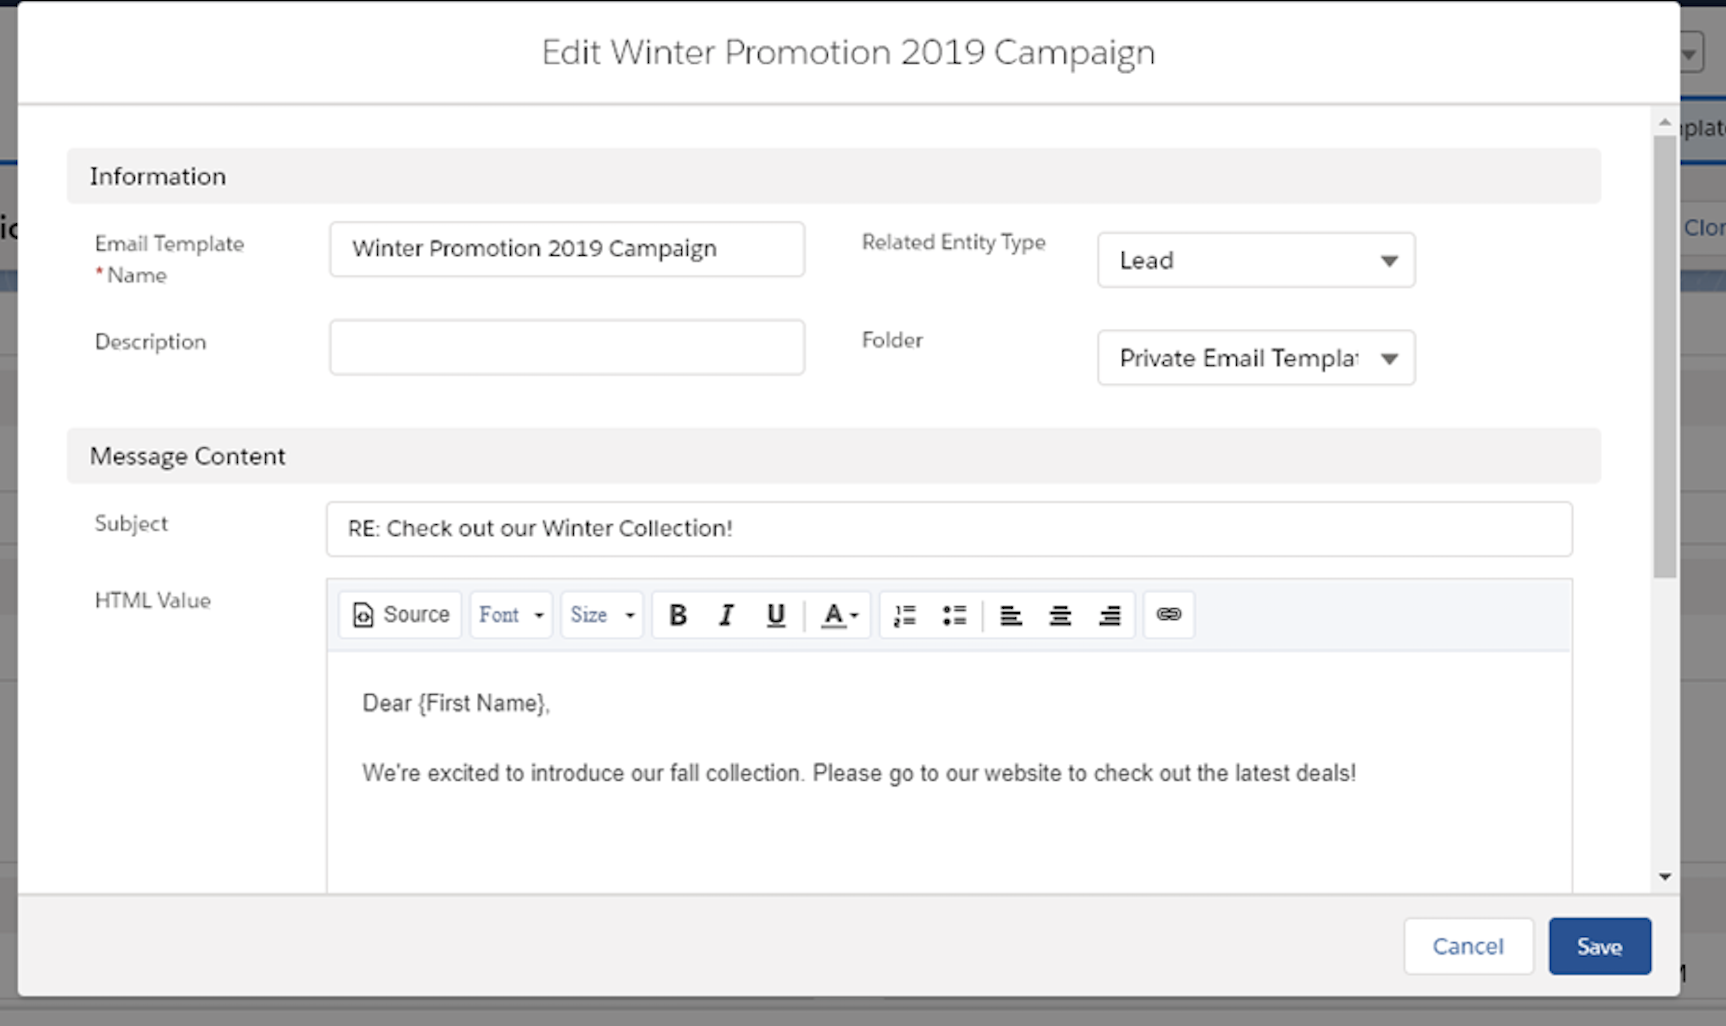
That will then guide you through the process of choosing an email template (or creating your own) and then finally sending it out to the designated recipients.
Track Your Salesforce Campaign
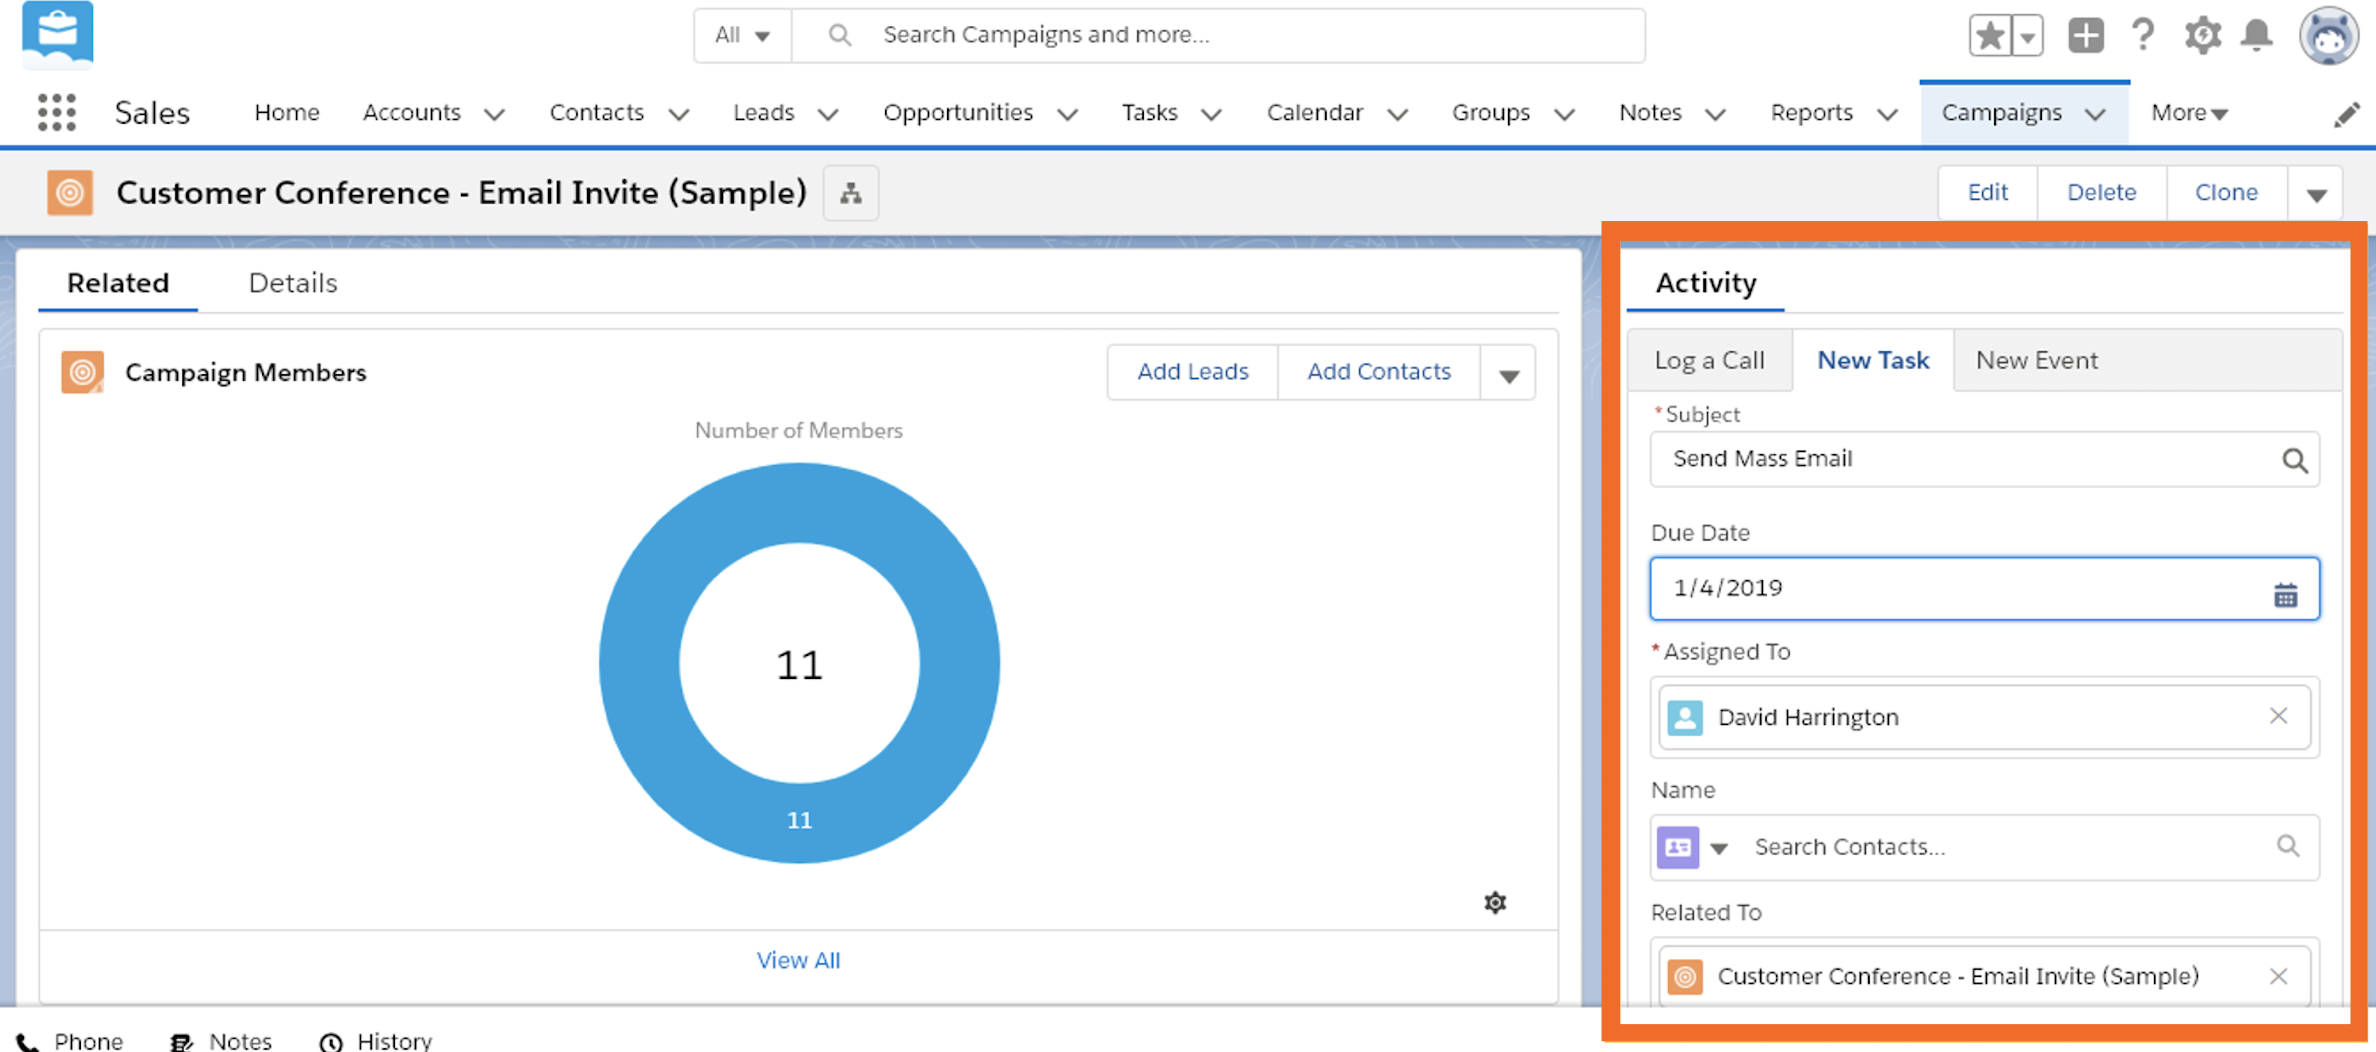
Whether you're sending a mass email from within Salesforce or another application (Mailchimp or Infusionsoft, for example), make sure the activity is documented in the Campaign tab in the activities sidebar. Many campaign activities conducted within Salesforce are automatically recorded (email and social campaigns, for example), but others such as telesales campaigns will need to be manually recorded. Tracking campaign activities—e.g., email responses or what was said during a phone call—is critical in building a complete history of your sales prospects and customers for future reference.
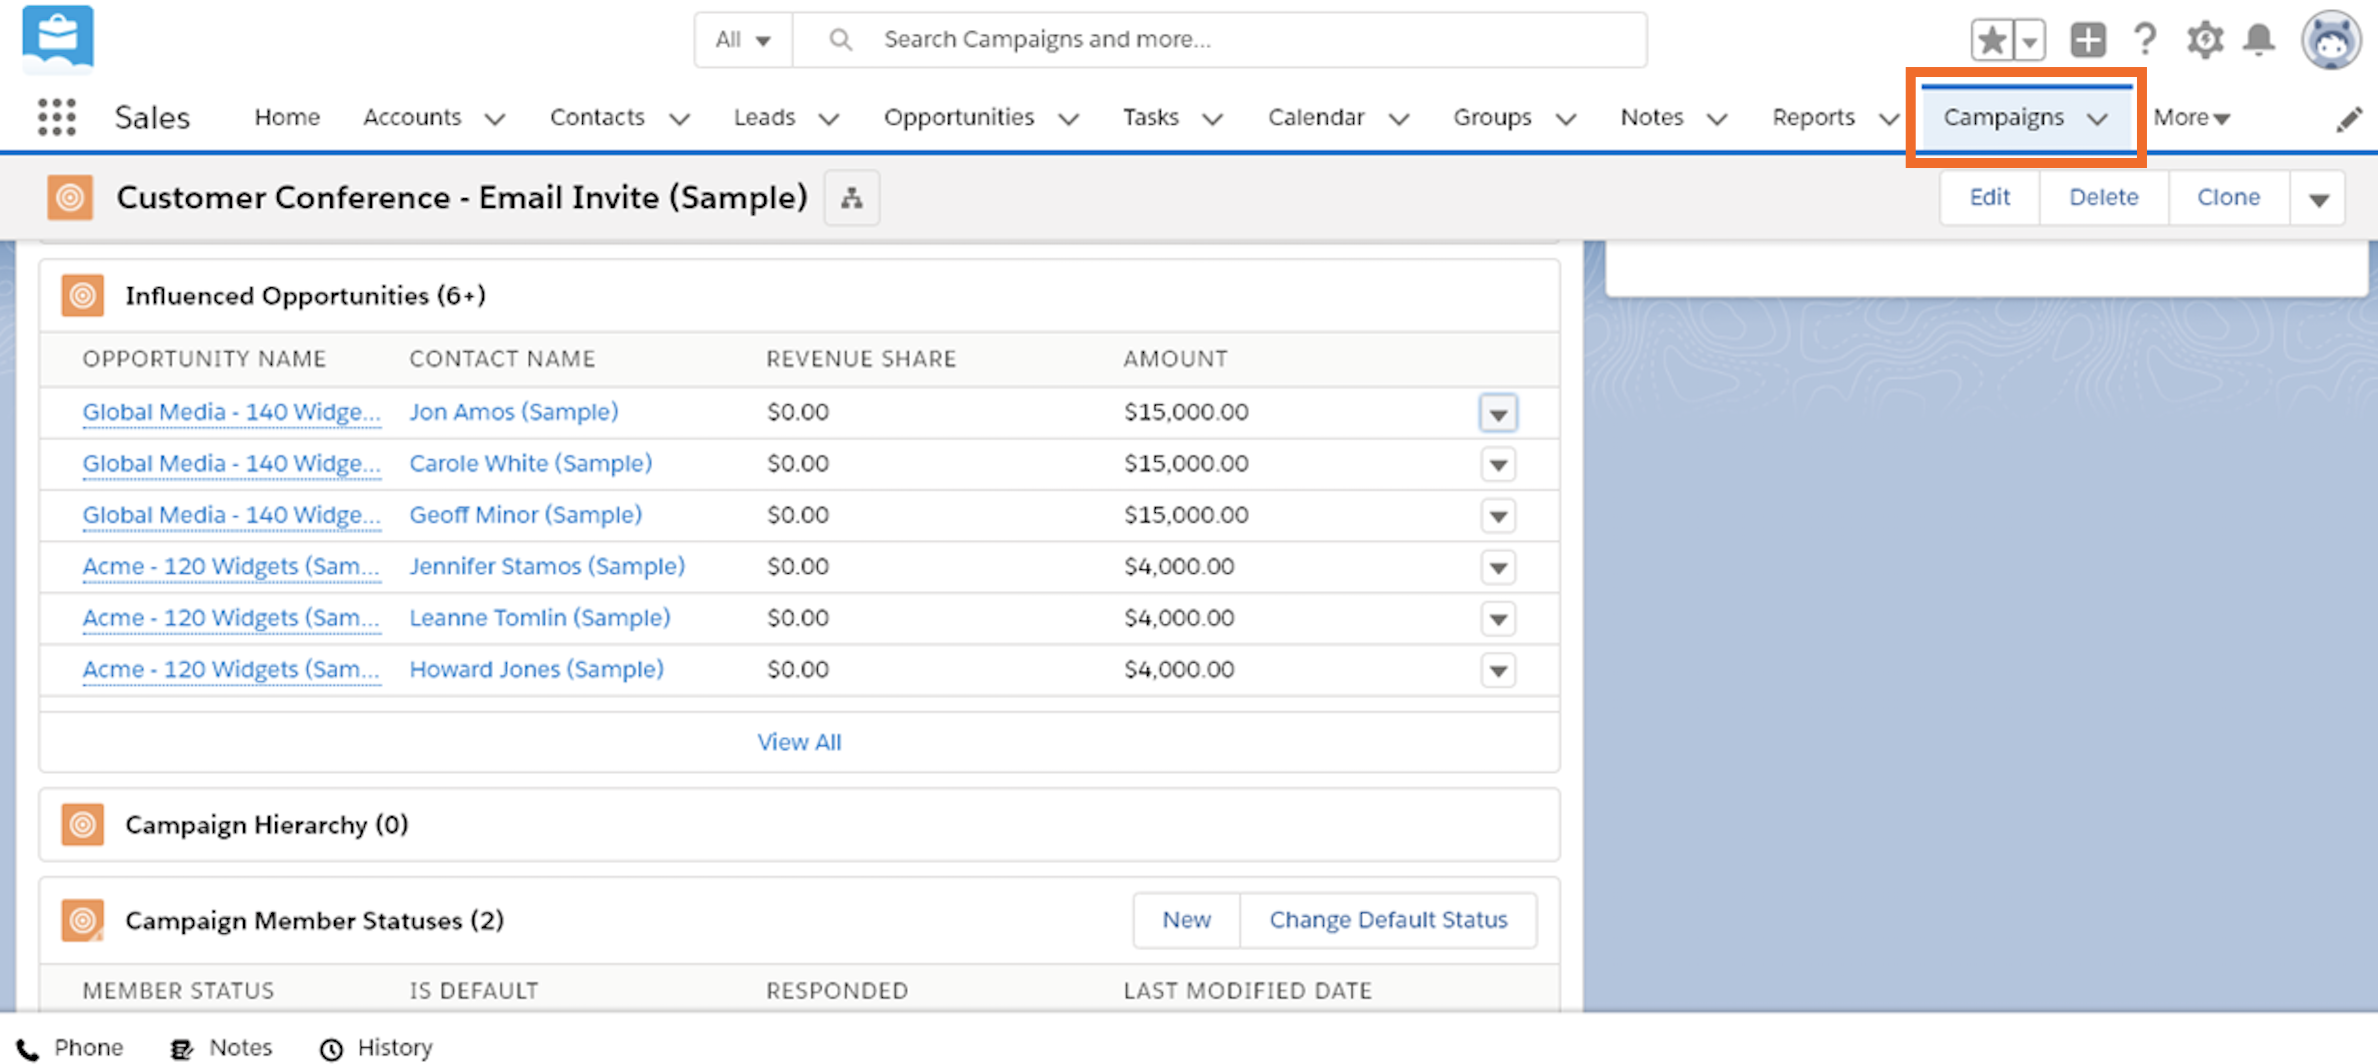
Finally, keep tabs on the results of your campaign as leads or contacts begin turning into sales opportunities. On the Campaigns main screen, you'll be able to see which active sales opportunities were influenced by your campaign and drill down into how much they're worth, what stage they're at, and when the sale is estimated to close. Each specific opportunity will also contain a brief campaign influence snapshot, so you can get an idea of what campaign activities went into the opportunity and adjust your next campaigns accordingly.
One of the biggest benefits to creating, executing, and tracking campaigns through Salesforce is that it streamlines the process of turning targeted campaign individuals into warm leads, opportunities, and closed sales. You'll also have a more holistic picture of each contact, lead, and account within Salesforce because you'll be able to view, analyze, and track any past marketing campaigns associated with any lead or contact.
from The Zapier Blog https://ift.tt/2F3hBTk
- Get link
- X
- Other Apps
Comments
Post a Comment